크레인 후크를 설치하는 방법?
2025-06-09
크레인 후크를 설치하는 것은 단순히 부품에 볼트로 고정하는 것이 아닙니다.; 크레인과 부하 사이의 중요한 링크를 통합합니다.. 결함이 있는 설치로 인해 치명적인 오류가 발생할 위험이 있습니다.. 정밀도에 초점을 맞춘 검증된 프레임워크를 분석해 보겠습니다., 안전성 검증, 장기적인 신뢰성.
단계 1: 중요한 기초 - 준비 & 점검
단계 2: 정밀 리프트 & 연결
-
1. 작업 공간 확보:
- 리프트 경로 아래에 명확하게 표시된 제외 구역을 설정하십시오..
- 크레인이 전원으로부터 분리되어 있는지 확인하십시오. (잠금/태그아웃 – LOTO 절차 준수).
- 리프팅 장비를 사용하여 호이스트 블록 아래에 후크를 편리하게 배치하세요..
-
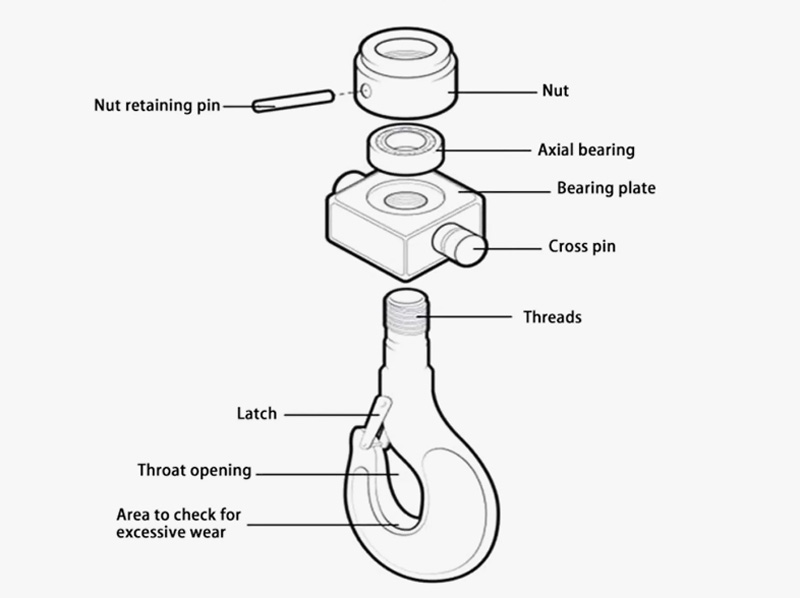
2. 스레드 준비가 핵심입니다:
- 체이서와 클리너를 사용하여 호이스트 로프/체인 끝 스레드와 후크 생크 스레드를 모두 꼼꼼하게 청소합니다.. 그리스를 모두 제거하세요., 흙, 녹, 또는 금속 조각. 오염물질은 적절한 토크와 안착을 방해합니다..
-
3. 실 처리 적용 (지정된 경우):
- 매뉴얼을 참조하십시오! 승인된 스레드 윤활제나 잠금 화합물의 정확한 유형과 양을 스레드에만 바르십시오., 베어링 표면이나 후크 시트를 피하십시오.. 초과분을 닦아내십시오..
-
4. 리프트 & 초기 참여:
- 리프팅 아이를 사용하여 후크를 제자리로 조심스럽게 들어올립니다.. 후크 생크를 호이스트 로프/체인 끝과 완벽하게 정렬하십시오..
- 핸드스레드 우선: 천천히 그리고 조심스럽게 손으로 후크를 로프/체인 스레드 위로 돌립니다.. 매끄럽고 쉽게 끼워져야 합니다. 묶는다면, 멈추다. 강요하지 마세요! 정렬을 다시 확인하세요., 스레드, 그리고 잔해. 강제로 스레드가 복구 불가능하게 손상됨.
-
5. 최종 조임 - 토크가 법칙입니다:
- 완전히 손으로 조이고 안착되면, 보정된 렌치를 사용하여 제조업체가 지정한 토크를 적용합니다..
- 부드럽고 안정적으로 조이십시오.. 토크를 초과하지 마십시오. 과도한 토크로 인해 실이 늘어나거나 벗겨질 수 있습니다..
- 팁의 경우: 가능하다면, 로프/체인이 회전하는 것을 방지하는 방법을 사용하십시오. (예를 들어, 너트 위의 로프에 있는 스트랩 렌치) 후크를 조이는 동안. 이는 진정한 토크 적용을 보장합니다..
-
6. 안전장치 확보:
- 제조업체의 지침에 따라 안전 와셔 또는 고정 칼라를 즉시 설치하고 올바르게 장착하십시오.. 이것이 풀림에 대한 2차 방어책입니다..
단계 3: 확인 & 시운전 – 안전망
-
1. 시각적 재검사: 전체 연결을 검사하세요. 후크가 올바르게 장착되었는지 확인하세요., 안전 장치가 제대로 작동되어 있는지, 눈에 띄는 틈이나 정렬 불량이 없습니다..
-
2. 기능 테스트 (걸쇠): 장착 된 경우, 안정적인 작동을 보장하기 위해 래치 메커니즘을 반복적으로 테스트하십시오..
-
3. 무부하 테스트:
- 지역이 맑아지면서, 크레인 제어 장치를 사용하여 전체 범위에 걸쳐 후크를 천천히 올리고 내립니다..
- 원활한 작동을 위해 관찰하세요, 이상한 소리는 없어 (특히 스위블에서), 그리고 후크가 예기치 않게 비틀리지 않고 제대로 걸려 있는지 확인합니다..
-
4. 초기 부하 테스트 (비판적인!):
- 후크 설치/교체 후 부하 테스트에 대해서는 해당 회사/국가의 규정을 따르십시오..
- 일반적으로 하중을 점차적으로 들어 올리는 작업이 포함됩니다. 100% SWL의 (때때로 125% 최초 인증 – 규정 참조), 안전한 높이에서 잠시 잡고, 부하가 걸린 상태에서 연결을 검사합니다..
- 찾으십시오: 어떤 움직임이라도, 회전, 또는 청각적 표시 (삐걱거리는 소리) 스레드 연결에서. 어떤 움직임이라도 실패를 의미합니다. 즉시 낮추고 조사하세요.!
-
5. 선적 서류 비치: 후크 설치 날짜를 기록하십시오., 부품 번호, 일련 번호 (해당되는 경우), 적용된 토크, 크레인 로그북의 부하 테스트 결과.
설치 이후: 운영자의 만트라
-
사전 사용 검사: 후크를 육안으로 검사, 걸쇠, 및 연결 스레드 매번 사용하기 전에. 균열을 찾으십시오, 흉한 모습, 또는 풀림의 징후.
-
측면 로딩 방지: 설계하중은 후크 중심선을 따라 수직으로 작용합니다.. 측면 하중은 응력을 크게 증가시키고 후크를 구부리거나 부러뜨릴 수 있습니다..
-
즉시 신고: 모든 손상, 비정상적인 마모, 또는 연결 무결성에 대한 의심이 보고되고 후크 서비스가 중단되어야 합니다..
결론: 그것은 후크 그 이상입니다, 생명선이다
설치 크레인 후크 공학에 대한 존중을 요구한다, 꼼꼼한 절차, 그리고 안전에 대한 확고한 의지. 서두르거나 코너를 자르는 것은 생명과 장비를 가지고 도박을 하는 것입니다.. 이 정밀 중심 프레임워크를 따르면서 준비를 강조합니다., 스레드 무결성, 보정된 토크, 엄격한 검증 – 간단한 설치를 안전하고 신뢰할 수 있는 크레인 작동의 초석으로 전환. 하중을 초과하는 단조 강철 조각의 중요한 역할을 결코 과소평가하지 마십시오.. 바로 설치하세요, 항상 검사해.


최신 의견