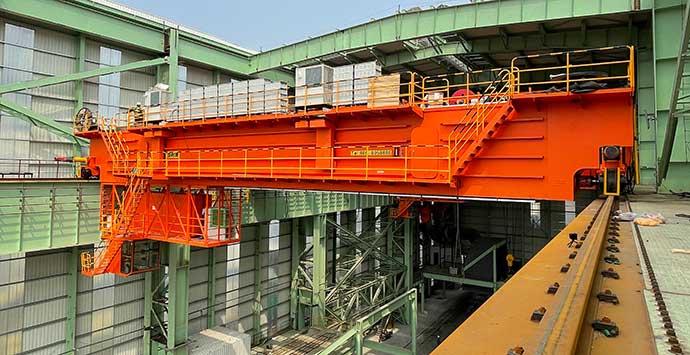
وقتی صحبت از جابجایی مواد سنگین می شود, ایمنی, ثبات, and efficiency of cranes rely heavily on the quality of their track installation and laying. Even millimeter-level deviations can lead to severe issues—from premature wheel wear and excessive vibration to catastrophic derailment. Whether you’re installing overhead crane tracks, gantry crane rails, or monorail systems, adhering to strict specifications is non-negotiable. در این وبلاگ, we’ll break down the detailed requirements, مراحل گام به گام, key tolerances, and best practices to ensure your crane track system operates reliably for years to come.
1. آماده سازی قبل از نصب: Lay the Foundation for Success
Before any track is laid, thorough preparation is critical to avoid costly rework and safety hazards. This phase sets the stage for precise installation and long-term performance.
1.1 Material and Component Inspection
Start by verifying the quality of all components to ensure they meet industry standards and design requirements:
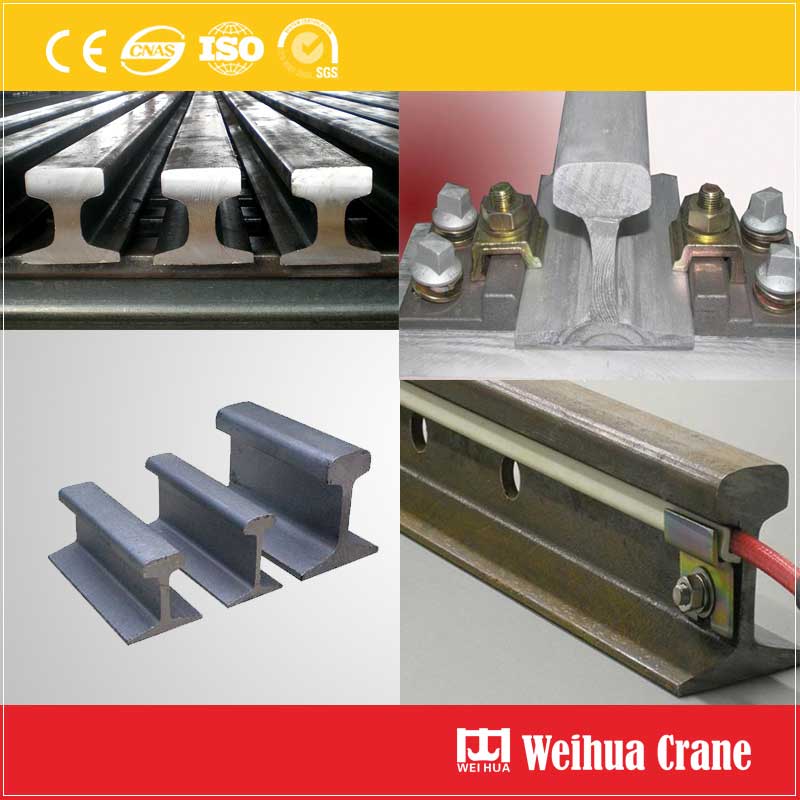
- ◆ Rail Quality: Inspect rails (به عنوان مثال, QU-type crane-specific rails, P-type railway rails, or square steel rails) for visible defects such as cracks, bubbles, اجزاء, or surface peeling. For GB QU70 rails, به عنوان مثال, check dimensions (ارتفاع, عرض, head radius) and confirm the material (typically U71Mn) meets specifications. Ensure the rail surface is free of excessive rust or damage, as these can compromise load distribution.
- ◆ Fasteners: Examine track clamps, پیچ و مهره, fishplates (splice plates), واشر, and elastic pads. Fasteners must be free of deformation, خوردگی, or thread damage. For high-strength bolts, verify they meet the torque requirements specified in JGJ 82 (Code for Design, Construction and Acceptance of High-Strength Bolt Connections in Steel Structures).
- ◆ Base and Support Structure: Inspect the crane rail beam (بتن یا فولاد) for settlement, inclination, ترک, یا تغییر شکل. For steel beams, check mid-span verticality (≤h/500, where h is the beam height), horizontal side bend (≤l/1500, max 10mm), and vertical arch (≤10mm). The deviation between the beam’s center position and the design axis should not exceed 5mm. For concrete beams, ensure the surface is flat and solid, with a flatness error of ≤2mm per meter.
1.2 Tool and Equipment Preparation
Equip your team with the right tools to ensure precision and safety:
- ◆ Measuring Tools: Theodolite, سطح, laser rangefinder, vernier caliper (accuracy 0.02mm), feeler gauge, 1m steel ruler, and tensioned steel wire (with a tensioner) for straightness checks. For span measurement, use a steel tape with a spring scale to control tension, ensuring accurate readings.
- ◆ Installation Tools: آچار گشتاور (for precise bolt tightening), sledgehammer, crowbar, portable grinder, welding equipment (for rail splicing), and hydraulic jacks (for rail adjustment).
- ◆ Safety Equipment: Dual-hook safety belts, non-slip shoes, کلاه های سخت, warning tape, walkie-talkies, and fire extinguishers. For high-altitude work, ensure scaffolding is securely erected and inspected before use.
1.3 Safety Preparations
Prioritize safety with these critical steps:
- ◆ Shut down and disconnect the crane’s power supply, hanging a “No Close, People Working” sign on the control panel to prevent accidental startup.
- ◆ Isolate the work area with warning tape to keep unauthorized personnel out. In multi-crane environments, use physical barriers to prevent adjacent cranes from entering the work zone.
- ◆ Conduct a safety briefing for all team members, clarifying tasks, hazards (به عنوان مثال, rail displacement, falling objects), and control measures. Ensure all workers hold valid special equipment operation certificates or on-the-job qualifications.
2. Key Installation Specifications: Step-by-Step Execution
With preparations complete, follow these detailed steps to ensure precise track installation, focusing on alignment, fastening, and joint handling.
2.1 Layout and Positioning
Accurate layout is the foundation of proper track alignment. Follow these guidelines:
- ◆ Using the crane beam’s positioning axis as a reference, mark the track centerline on the support structure. For overhead cranes, mark points every 2m along the beam’s length (and at each column) to create a clear reference line. For monorail systems, ensure the centerline aligns with the crane’s wheelbase to avoid lateral stress.
- ◆ Set reference points at both ends and the middle of the track to control elevation and levelness. The elevation error of reference points should be within ±1mm. For gantry cranes, the deviation between the track centerline and the reference line must be controlled strictly to prevent skewing.
2.2 Rail Laying and Alignment
Proper rail placement and alignment are critical to prevent crane “gnawing” (wheel flange wear) و ارتعاش. Adhere to these tolerances and steps:
- ◆ Rail Lifting: Use a crane (به عنوان مثال, 8t truck crane) to lift rails to the support beam, placing 20mm thick wooden blocks under the rails to protect the surface. Ensure the rail is stable during lifting to avoid collision and deformation.
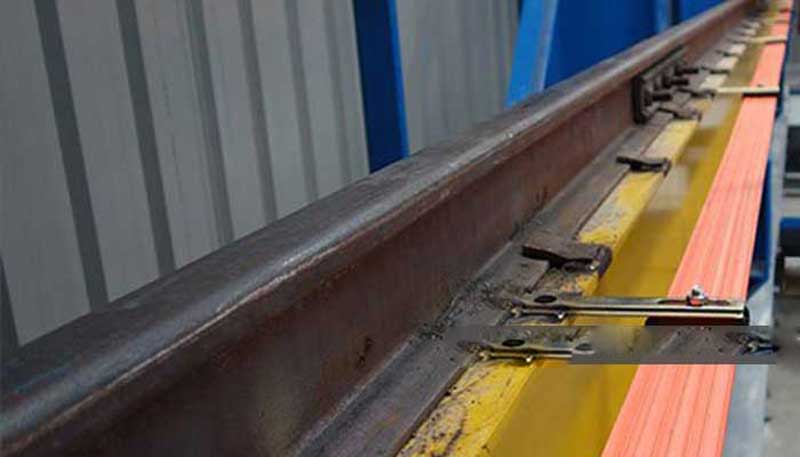
- ◆ Elastic Pad Installation: Lay elastic pads under the rails to absorb vibration and reduce wear. The pad width should be 10-20mm wider than the rail bottom, and the length should exceed 100mm if the gap between the rail and beam exceeds 200mm. Do not use more than 3 layers of pads at any point, and ensure pads are securely welded to the support beam if necessary.
- ◆ Alignment Adjustment:
- ◆ Straightness: Pull a tensioned steel wire along the track’s full length and measure the gap between the wire and the rail side. The deviation should not exceed 1.5mm per 6m segment, and the total straightness error over the full length should be ≤5mm. Use hydraulic jacks and special tools for cold correction if bending is detected.
- ◆ Span Deviation: For bridge cranes, دهانه (distance between two track centerlines) allowable deviation is ±5mm to ±10mm, depending on the span length. Measure at the ends and middle of each track segment using a tensioned steel wire (10-15kg weight) or theodolite. Adjust the rail position via clamps if deviations exceed limits.
- ◆ Elevation Difference: Use a level to measure the height difference between the two rails at the same cross-section. For most applications, this difference should not exceed 10mm (5mm for high-precision cranes). Adjust using shims (matching the design specifications) در صورت نیاز.
2.3 Rail Joint Handling
Rail joints are a common failure point, so proper handling is essential to avoid impact loads and misalignment:
- ◆ Joint Gap: Reserve a thermal expansion gap between rail sections. In cold environments (below 20°C), the gap should be 1-2mm; in warmer conditions (above 20°C), it should be 4-6mm. Too small a gap can cause rail buckling in summer, while too large a gap leads to severe wheel impact.
- ◆ Joint Misalignment: Use a 1m steel ruler to check for vertical (ارتفاع) and horizontal (جانبی) misalignment at joints. Both should not exceed 1mm. Grind the rail ends if misalignment is detected, and ensure fishplates fit tightly with no gaps. For welded joints, inspect for cracks, pores, or incomplete fusion, and ensure the weld is smooth and transitions seamlessly with the rail surface.
- ◆ Joint Fastening: Secure joints with fishplates and high-strength bolts, tightening them to the specified torque (به عنوان مثال, 250N·m for M20 bolts). Check for loose bolts regularly, as vibration can reduce torque over time.
2.4 Fastening and Fixation
Track clamps (fixed or adjustable) are used to prevent lateral and longitudinal displacement. Follow these rules:
- ◆ Clamps should be installed at intervals of no more than 200mm, ensuring the rail is held firmly without damaging the surface. The contact area between the clamp and rail should be at least 60% of the nominal contact surface.
- ◆ Tighten bolts using a torque wrench to the manufacturer’s specifications. Avoid over-tightening (which can deform the rail) or under-tightening (which allows movement). Implement a torque check schedule to maintain fastener integrity.
- ◆ Install end stops (baffles) at the end of the track to prevent the crane from derailing. Ensure end stops are securely welded or bolted to the support structure.
3. Post-Installation Inspection and Testing
پس از نصب, a comprehensive inspection is required to verify compliance with specifications and ensure safe operation. Document all results for future reference.
3.1 Visual and Physical Inspection
- ◆ Check for loose fasteners, misaligned rails, or damaged components. Ensure the rail surface is clean (free of oil, گرد و غبار, یا آوار) and that elastic pads are properly positioned.
- ◆ Inspect welds (در صورت استفاده) for defects using visual checks or non-destructive testing (NDT) methods like dye penetrant testing for small cracks. For critical applications, use ultrasonic testing to detect internal flaws.
3.2 Precision Measurement
- ◆ Recheck key parameters: دهانه, straightness, elevation difference, and joint alignment. Ensure all tolerances are within the specified limits (رجوع به GB/T شود 3811, GB 6067, or GB 50278 for industry standards).
- ◆ Test the crane’s movement along the track. Listen for abnormal noises (به عنوان مثال, سنگ زنی, squeaking) and check for excessive vibration. If “gnawing” is detected, recheck alignment and adjust as needed.
3.3 مستند سازی
تمام نتایج بازرسی را ثبت کنید, including measurements, component specifications, and any adjustments made. This documentation serves as a baseline for future maintenance and compliance audits.
4. Maintenance Specifications: Extend Track Lifespan
Proper maintenance is as important as installation to ensure long-term performance. Implement a preventive maintenance strategy to avoid unplanned downtime and costly repairs.
4.1 بازرسی های روزانه
- ◆ Clean the track surface daily to remove debris, روغن, or snow—these can cause wheel slipping and uneven wear. Use a wire brush or specialized cleaner for tough stains.
- ◆ Check for loose bolts, damaged clamps, or rail surface wear. روی مناطق پر استرس تمرکز کنید (به عنوان مثال, crane braking zones) where wear is most common. If rail top wear exceeds 10% of the original size or side wear exceeds 15%, schedule replacement.
4.2 Periodic Maintenance (ماهانه / فصلنامه)
- ◆ Recheck alignment and torque: Use laser alignment tools to verify straightness and span, and retighten bolts to the specified torque. Replace any corroded or damaged fasteners.
- ◆ Inspect rail joints and welds for cracks or wear. Grind rough surfaces and re-weld if necessary. Check elastic pads for aging or damage and replace them to maintain vibration absorption.
- ◆ Lubricate the track surface (especially wheel-rail contact areas) with specialized rail grease to reduce friction and wear. هر کدام را روغن کاری کنید 100-200 working hours or at least once a week, بسته به فرکانس استفاده.
4.3 Long-Term Maintenance (سالانه)
Conduct a comprehensive inspection using NDT methods to detect internal rail cracks or fatigue. Evaluate the support structure for settlement or deformation and adjust the track if needed. Replace severely worn or damaged rails in accordance with installation specifications.
5. اشتباهات رایجی که باید از آنها اجتناب کنید
Even small errors during installation can lead to major issues. Watch for these common pitfalls:
- ◆ Ignoring thermal expansion gaps: This leads to rail buckling in summer or excessive impact in winter.
- ◆ Inadequate alignment: Millimeter-level deviations cause premature wheel wear and “gnawing,” reducing the lifespan of both rails and wheels.
- ◆ Under-tightening fasteners: Vibration loosens bolts over time, leading to rail movement and instability.
- ◆ Skipping pre-installation inspections: Defective rails or support structures will fail prematurely, even with proper installation.
- ◆ Neglecting maintenance: Reactive maintenance (repairing after failure) is more costly than preventive maintenance and increases safety risks.
افکار نهایی
Crane track installation and laying are precision tasks that require strict adherence to specifications, attention to detail, and a commitment to safety. By following the steps outlined in this blog—from pre-installation preparation to post-installation testing and ongoing maintenance—you can ensure your crane track system operates safely, به طور موثر, و قابل اعتماد. به یاد داشته باشید: millimeter-level accuracy today prevents catastrophic failures tomorrow.
Whether you’re installing a new system or maintaining an existing one, always reference industry standards (GB/T 3811, GB 6067, GB 50278) and consult with qualified professionals to address specific challenges. With the right approach, your crane track will support heavy loads and smooth operations for years to come.


آخرین نظرات